
Step-By-Step Painting- Acrylic Painting of Fuchsia
The fuchsia flowers are vibrant and their pretty drooping petals look like they would make pretty dresses for fairies. These flowers have adapted specifically to accommodate hummingbirds. They do particularly well in hanging baskets.
Materials
Brushes, Paints, Canvas, Free Printable

Step 1
The petal’s growth direction is very important. You can use the following image as a guide as you paint and blend colors. Sketch or trace the line drawing lightly on your canvas. You can also print it for Free here.

Step 2
Get your supplies ready. Make sure to have different shades of each color. For example, keep light red, regular red and dark red or mix with black to make a darker shade or white to make it lighter. Here we will be using shades of red purple and green.

Step 3
Use a clean brush to lay in a dark value of bright red on the top of the globe. Block in the violet in the darkest areas of the flower especially away from the tips. Mix in the rest of the petals with lighter shade of the bright red. Fill in the areas with the paints accordingly. Draw a white line around the petals to help you distinguish between each petal.


Step 4
Base the leaves and stems with the light green mix of sap green and white. Blend the colors on the petals and leaves in the appropriate growth direction.

Step 5
Base the pistil and stamens with dark red. Add highlights on the calyx lobe with a mixture of red and white to the tips of the petals. Highlight the pistil and stamen with white.

Step 6
Add highlights to the leaves and stem.

Step 7
Blend the highlights on the leaves in the right direction.

Step 8
Add the final details on stamens and pistils.
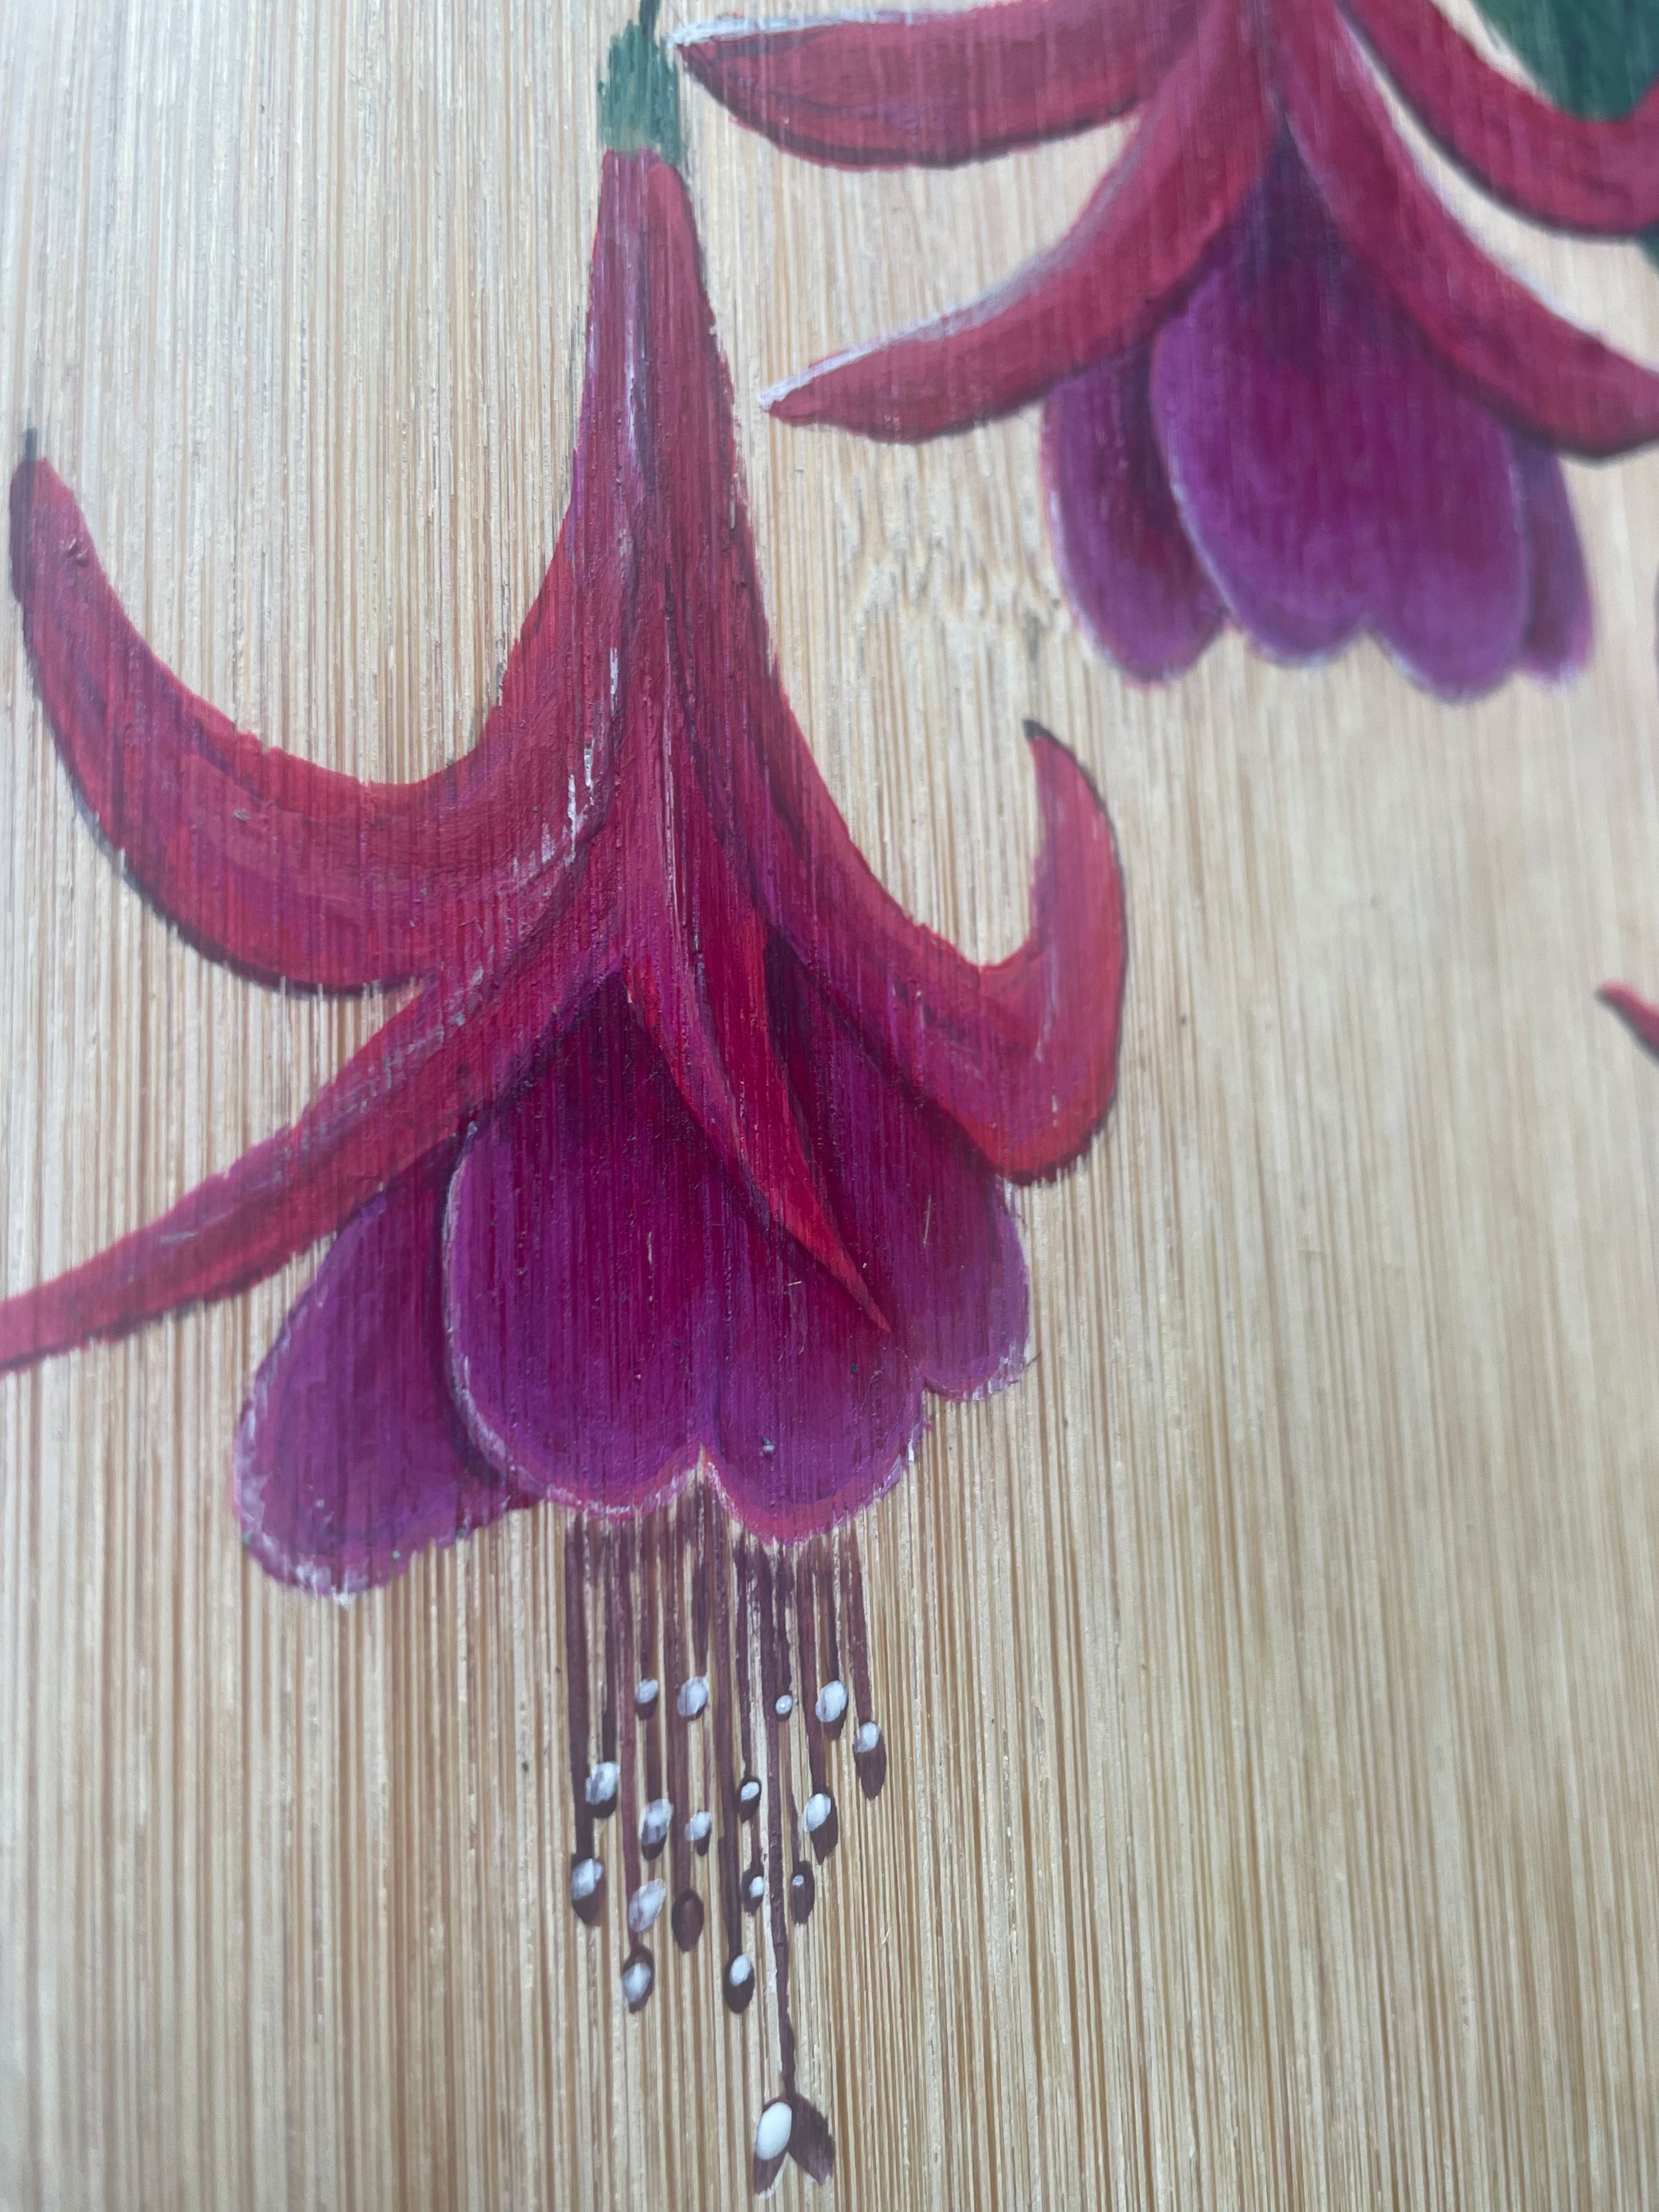
Here I have used a thin brush with darker tones where the shadows are and I have added highlights to the petal, leaf, and stem. Add the finer details and make it your own!!
Hope you enjoy painting these gorgeous flowers! If you try them, share your work with me @sheebachandini, #sheebachandini.


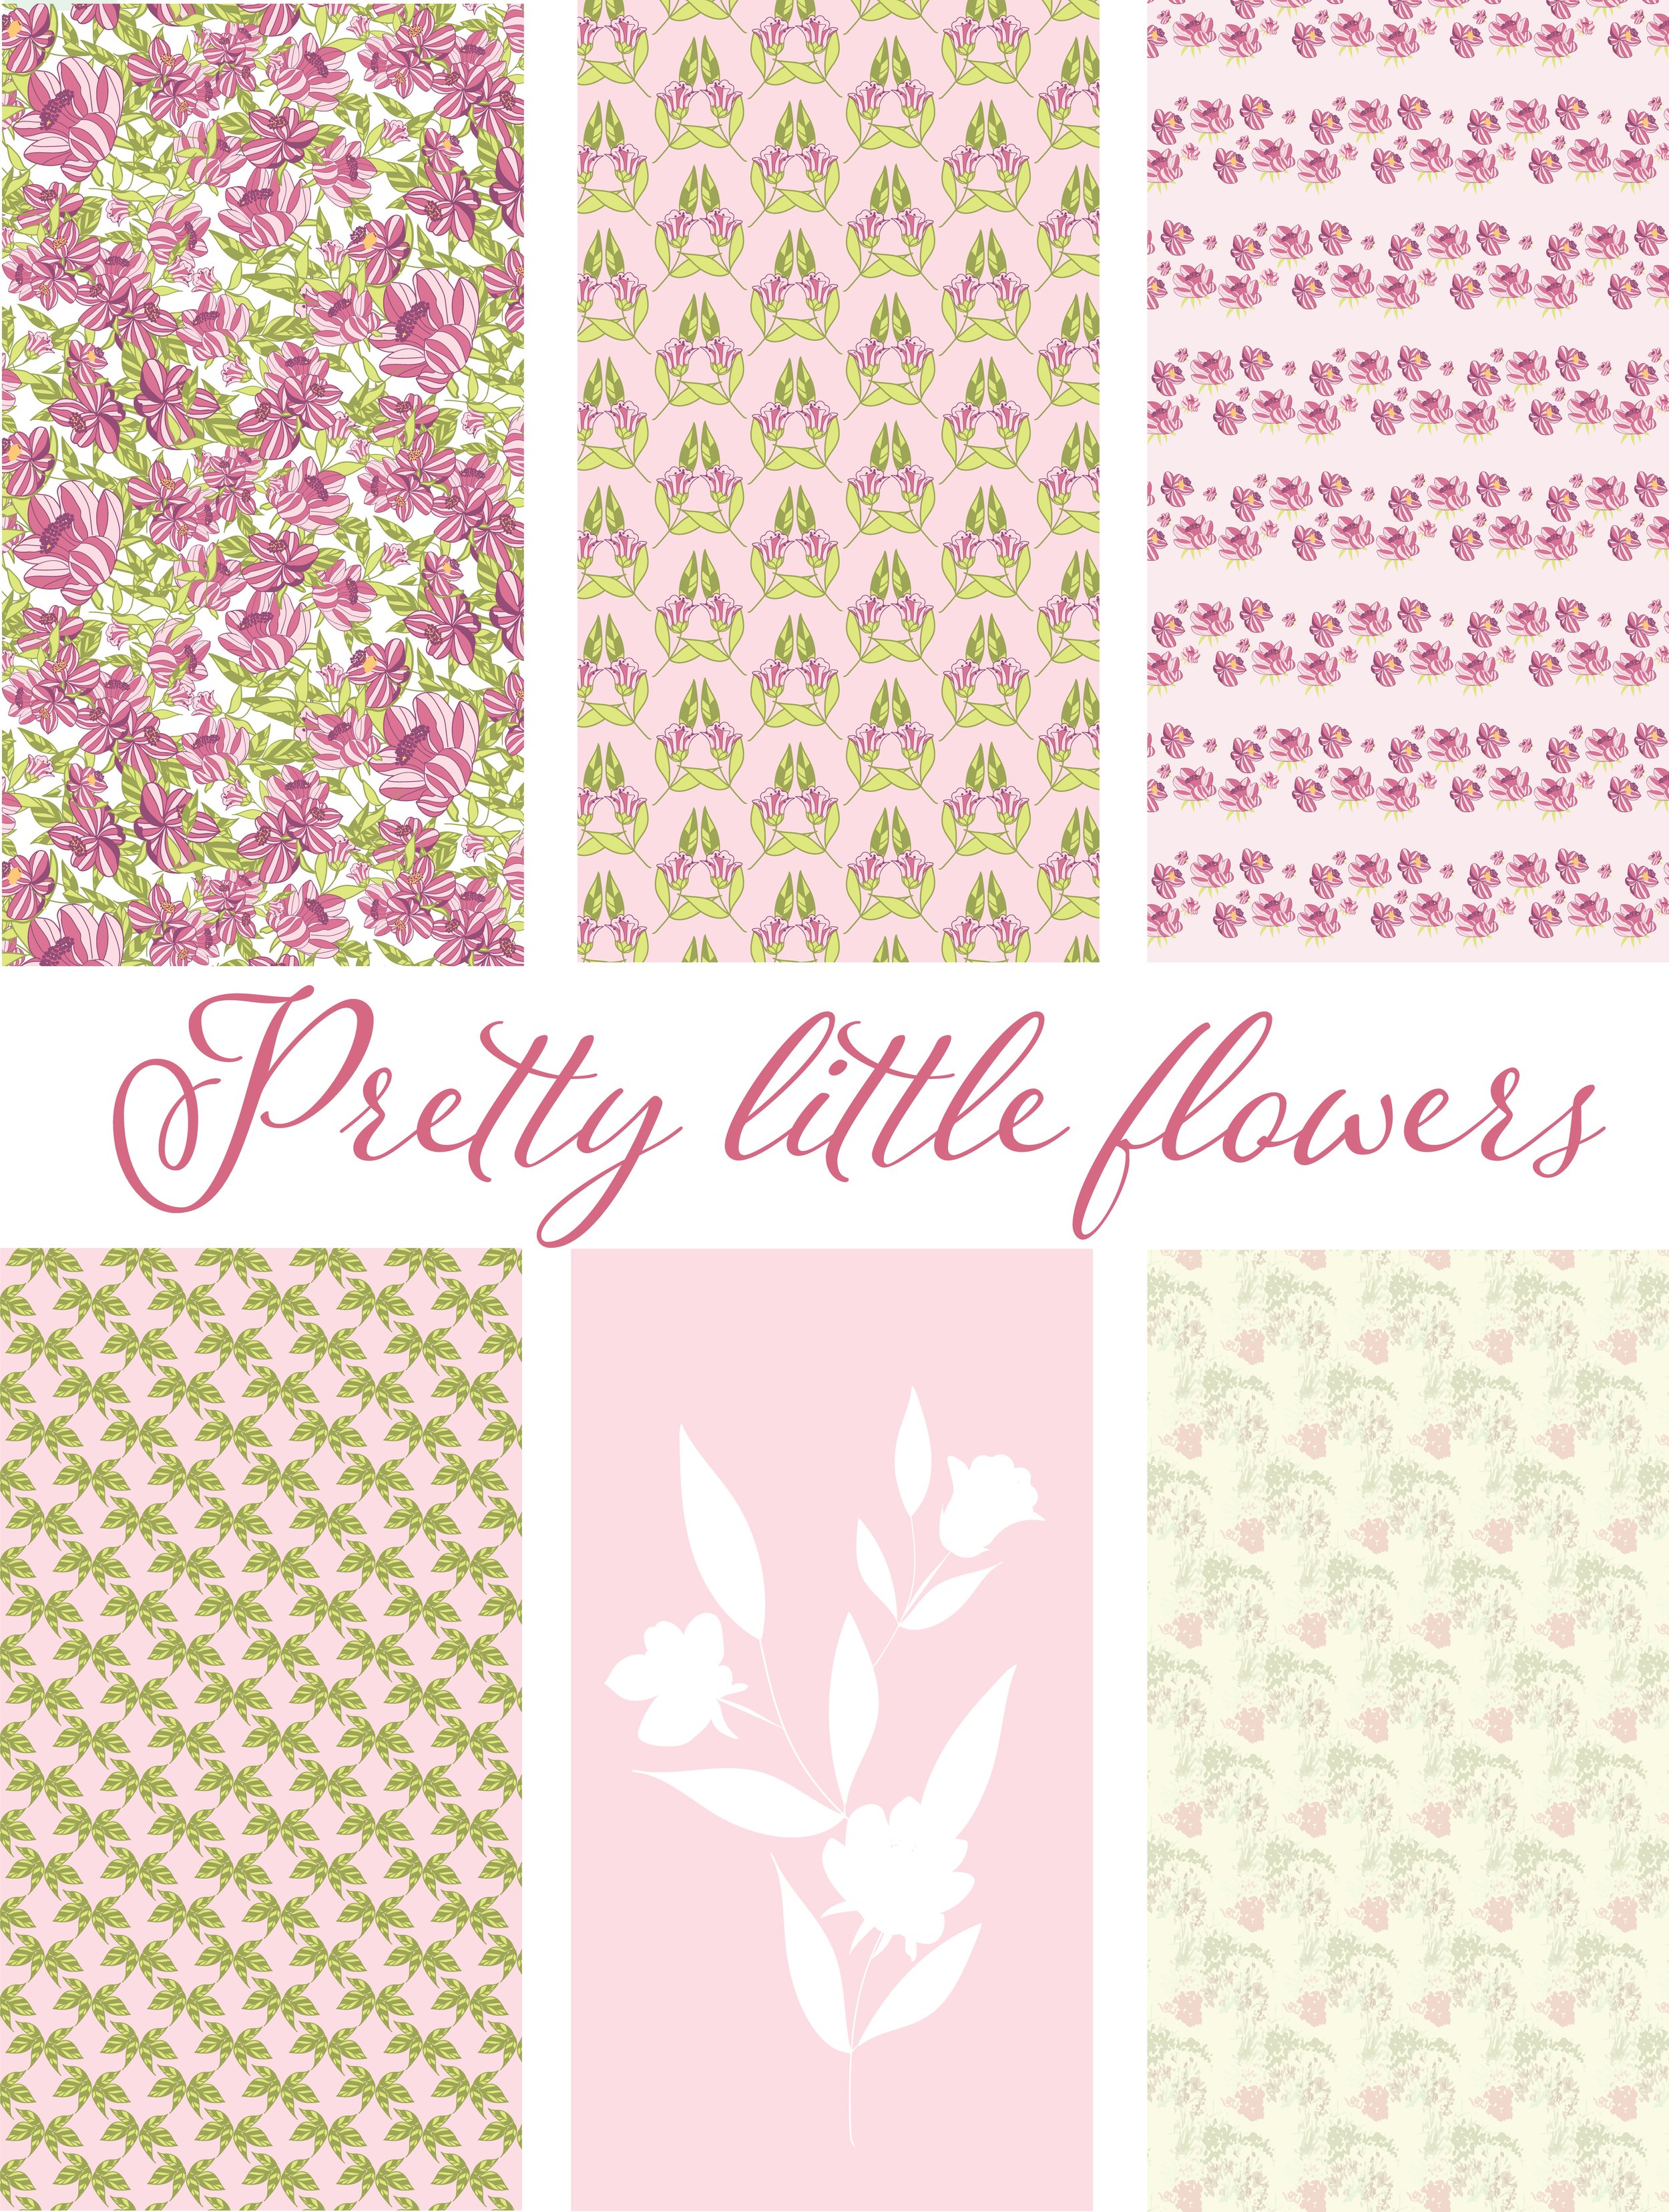
Pretty Little Flowers
These delicate, ‘Pretty little flowers’ collection was created by Sheebachandini. As we see the snow melt and the seeds starting to sprout we welcome spring into our homes to keep us warm on the coldest of nights. The light colors of spring slowly pull us towards her constantly longing for her lush colors which now seem alien to us as we brave the winter months. When we see the colors of spring, we see hope, joy, and prosperity. We rejoice as her colors peep through the thick beds of snow. The bright pinks of the roses wake us up in the morning along with their lavish aroma. The snow defrosts and allows the colors of spring to spread as a wildfire, the bright poppies flood our eyes as their beauty washes over us as a wave. Allowing the timid yellows to spread their petals and grow. We moan farewell as spring and all her beauty run off to another realm. We can always keep her memory deep in the soul to remember her until she returns. This collection would be perfect for collage and patchwork on yellow bags, high rise pants, midi skirts, blazers, utility jackets, baggy jeans, and to sow some fancy floral bustier.

3 Ways You Can Grow Your Creativity Using TEXTURED ART
What is textured art? This is a question that has been asked by artists and non-artists alike for many years. The answer to this question is not as straightforward as one might think. There are many different definitions of textured art, and the term can be used to describe a wide variety of works. In this blog post, ways you can grow your creativity using different mediums and methods creating textured art.
What is Textured art/mixed-media art?
Textured art is a type of mixed-media art that uses materials that are meant to be touched, including fabrics, paper, metals, plastics, glass, and other similar surfaces. These types of textures are incorporated into the artwork by either being applied onto the surface or being part of the substrate that supports the actual artwork. As this type of mixed-media art is tactile in nature, it provides sensory experiences for viewers when they interact with these pieces.
Different mediums/techniques that are being used:
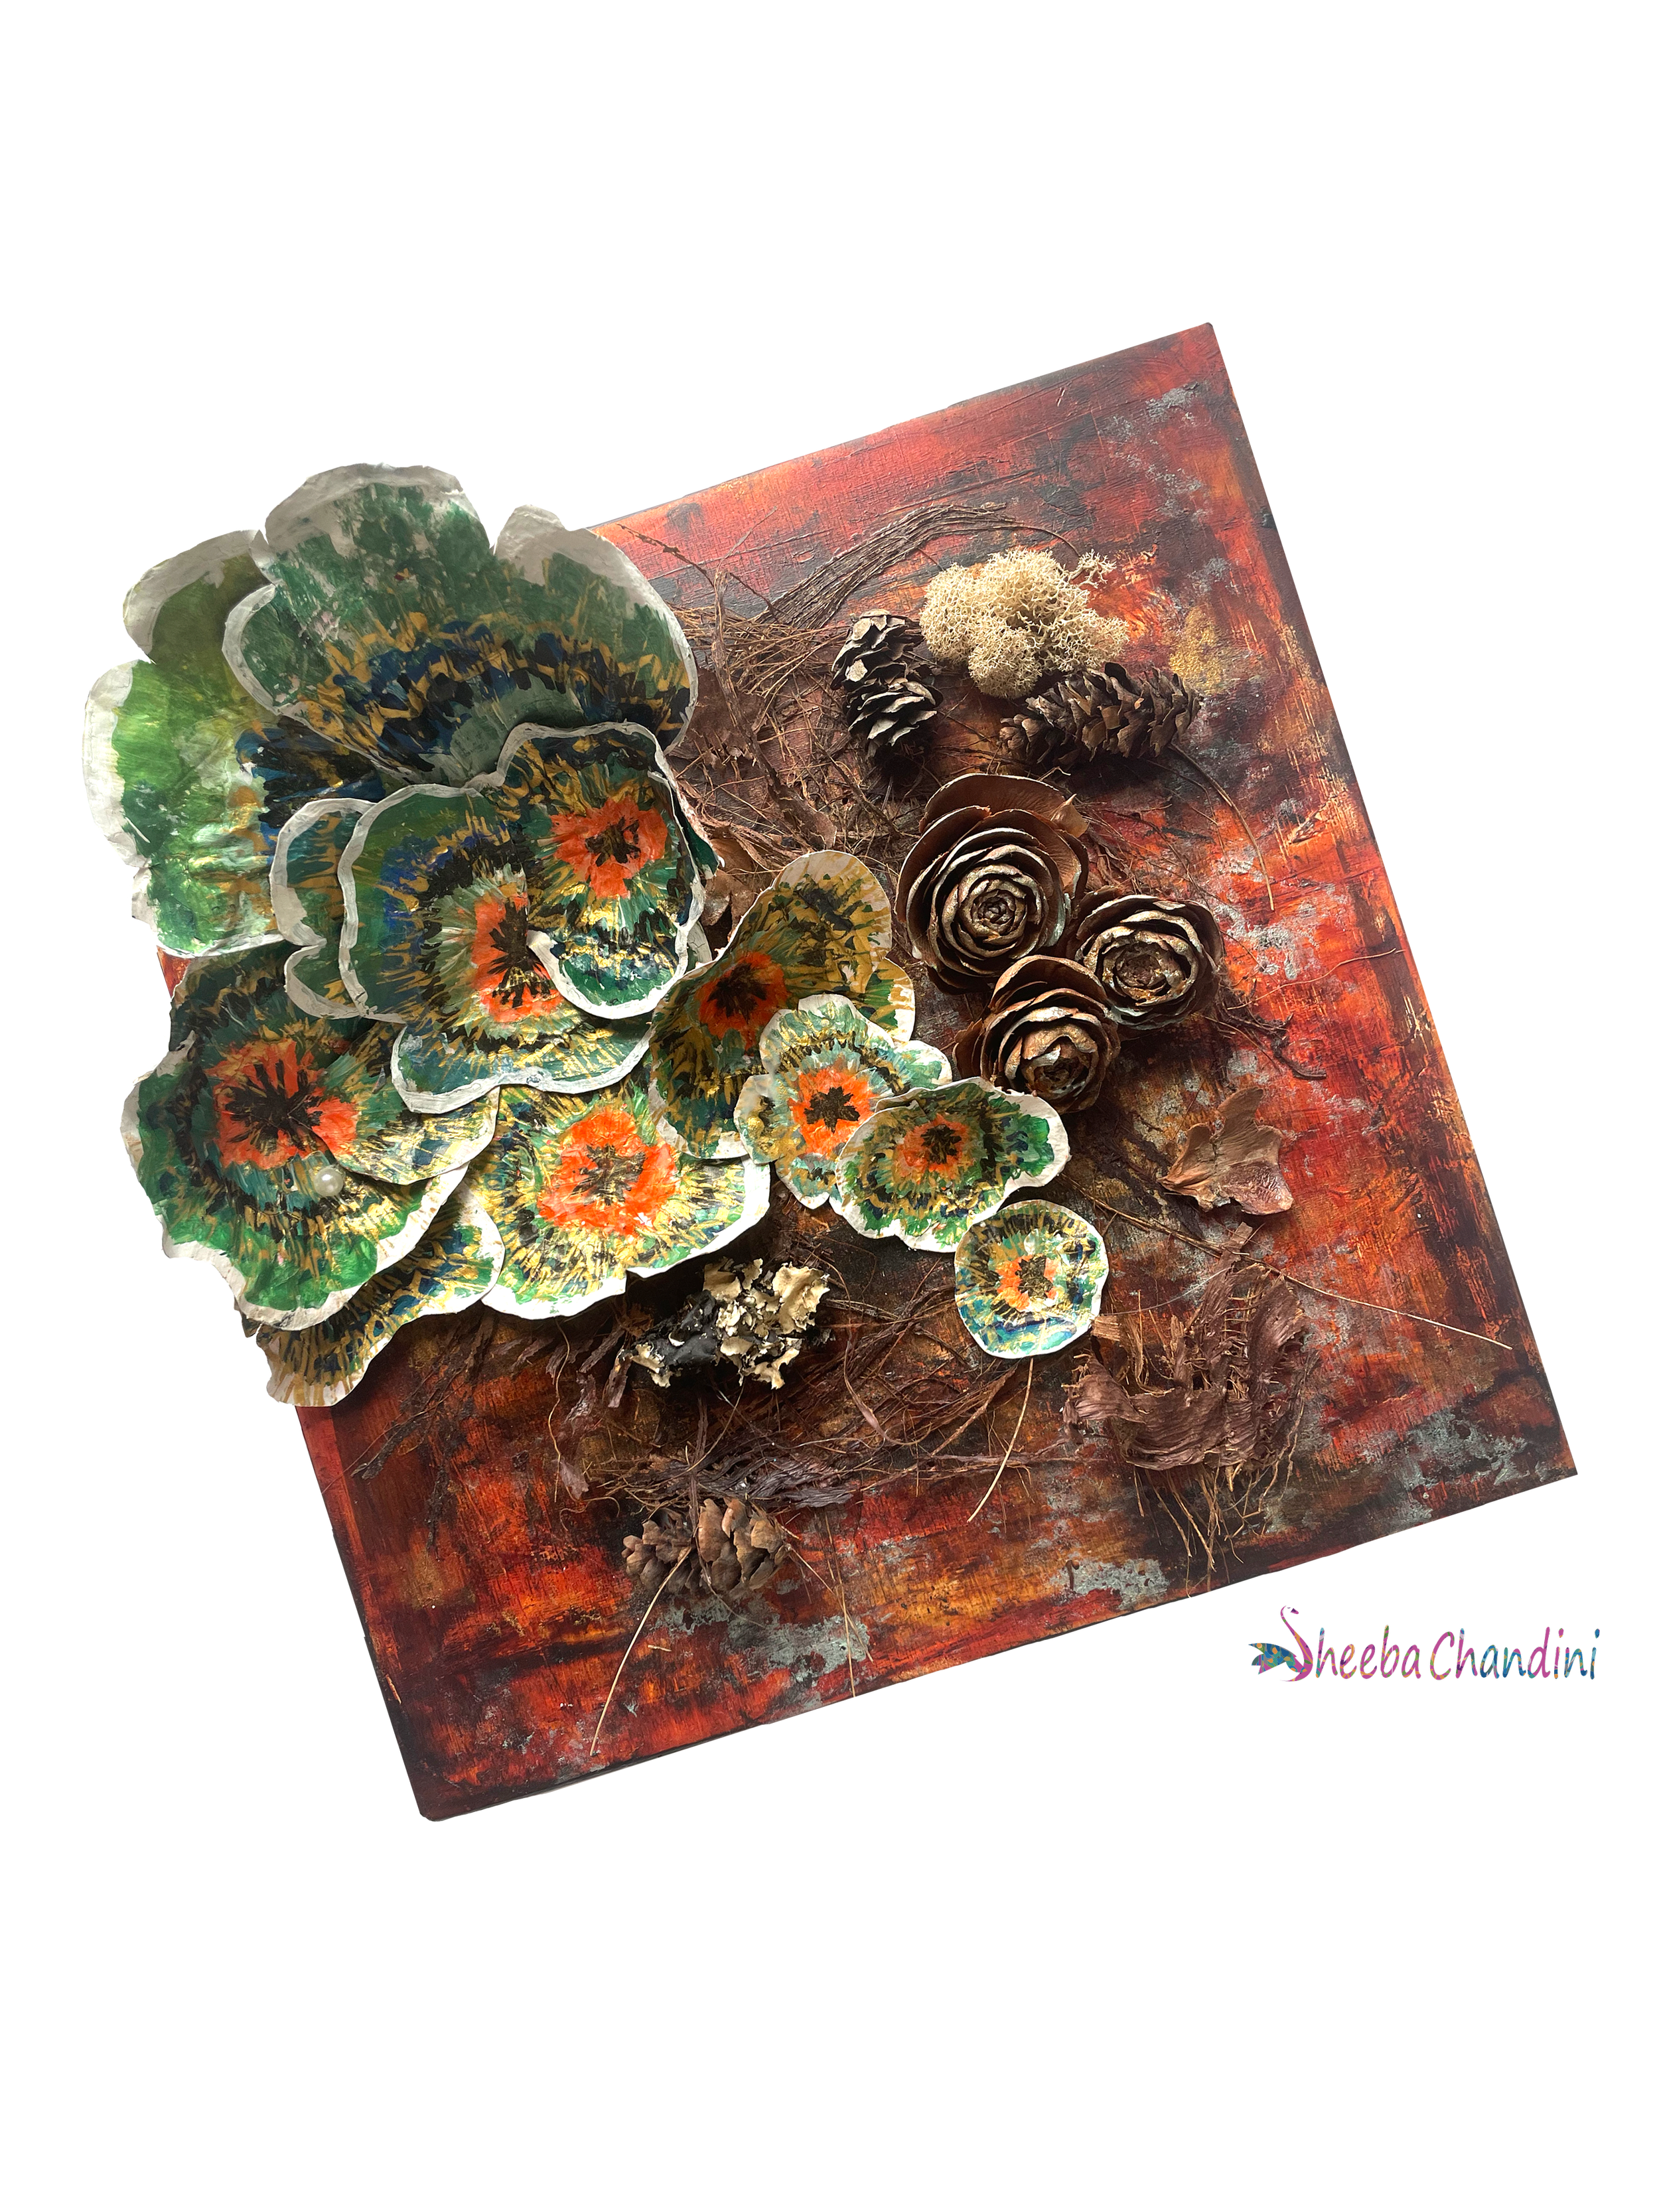
- Papercutting: In paper cutting, designs are cut from paper using knives or scissors. Many different types of designs can be made from paper cuts including flowers, leaves, trees, and other organic shapes along with geometric patterns and animal shapes. Quilled paper captures the essence of paper cutting beautifully with it’s swirls and geometric patterns. Using this technique I have made a wonderful butterfly.

- Painting: Different types of paints are commonly used for creating these types of artworks including acrylics, oils, and watercolors among others. I used acrylics to create thick layers to add dimension to this piece of art. The artist sculpted this beautiful heart with thick acrylic paint , making the shapes even more intriguing.

- Altering/Cutting: A surface is cut or altered in a variety of ways before a pigment is added. This can include cutting designs into objects, adding additional layers or parts to an object, or altering the surface by scratching, etching or burning. Here coffee filters add much needed depth to this work of art. These multiple layers give the work a beautiful and needed 3D effect.
Check out these artists for more inspiration!
Frida Kahlo (1907 - 1954): widely considered one of the most influential artists of the twentieth century, was known for her self-portraits which often incorporated textured materials such as paper, fabrics, and string.
Yulia Brodskaya, Is an amazing paper artist and illustrator. She creates some of the greatest masterpieces using just paper and glue. Her work uses a simple techniques that involves the placement of carefully quilled paper to make three dimensional pieces of art. https://www.artyulia.co.uk/
-Gottfried Helnwein: a contemporary artist whose artwork often revolves around political and historical issues. Some of his most known artworks include portraits created with textured materials such as paper, canvas, and metal
As you can see you can use a number of mediums to create textured art. The ideas are endless and I hope you are inspired to make new art using these ideas. Tag me on Instagram @sheebachandini with your creation.

Whimsical Flowers
Bring out the playful essence of these colorful flowers by focusing on the elegant shapes and the bright colors of the petals. Add layers to create the petals sweeping them out from the center to suggest a pinwheel movement. To add even more interest and depth, add lines, twirls and dots to accent the painting.
Materials

Step 1

Sketch or trace the line drawing lightly on your choice of paper. Although you may not be able to see the pencil line in the remaining steps, it will be a guide for placing each stroke.
Step 2
Prep your watercolor by dabbing some water on your watercolor pans. Load your brush with water and deposit a large drop into each pan. Let it sit while you set up the rest of your work station. The water will soften the watercolor cakes and prepare them for use. If you don't give your paints enough time to soften (about five minutes), you will not get enough pigment to paint.
Step 3

Use a clean brush and some clean water and paint the middle circle of a flower with plain water. (I am starting with the flower on the far right.) Next, load your paintbrush with light purple. Drop the paint in the center of the water circle and let the paint bleed away from the center.
Step 4

Now, load your paintbrush with dark purple. Drop the paint on the edges of the water circle and let the paint bleed towards the center. Work quickly before the water dries. This is the wet on wet technique.
Step 5

Using the same technique paint the centers of the flowers. I used yellow/orange, yellow/brown and orange/pink on the various flowers. Using a light color and a dark color from the same color family would make the centers stand out.
Step 6

Using more water and less pigment, paint in the petals. This is going to be your first layer.
Step 7

Complete painting all the petals. Make sure to use more water and less pigment. This step is important as you will be adding more layers to add depth and details to the petals.
Step 8

Paint in the stems using a rounded brush. Try to paint each stem with just one stroke making sure the pressure on the paintbrush is the same throughout the stroke. Changing the pressure on your paintbrush can thicken or thin out the stems.
Step 9

You can combine two pressures in the same stroke to paint a leaf. Start with a thin stroke right at the edge of the stem and then gradually thicken your stroke by increasing the pressure. Without lifting your paintbrush from the paper, gradually thin out into a point. Paint all the leaves making sure to overlap at times. This will add depth to your paintings.
Step 10

To add depth and interest to your painting, use the darker pigment of the same color and paint in the shadows as shown in the picture above. Deepening the tones by going over your strokes with darker mixes of the same colors already used in these areas will add beauty to your artwork. Carefully add darker tones throughout your work.
Step 11

Now it’s time to add the final touches. Here I have used a thin brush with darker tones to outline every petal, leaf, and stem. If you look closer I have added some thorns on the stems, veins on the leaves, decorated the centers, and petals of the flowers with dots, strokes, and lines. Have fun in this step and add your own twist to your painting. Make it your own!!
Hope you enjoy painting these whimsical flowers! If you try them, share your work with me @sheebachandini, #sheebachandini.

Sweet Sixties Collection
These gorgeous, groovy, 60s inspired florals blooming here were handpainted by Sheebachandini and created to take you on a trip back to the 60s.
These gorgeous, groovy, 60s inspired florals blooming here were handpainted by Sheebachandini and created to take you on a trip back to the 60s.
